基于 Python 的 Cocotb 库对 Verilog 进行仿真教程(一)
项目地址
👉 https://github.com/djdgctw/first_cocotb_testbench
本教程对应仓库的 01_base 示例,是 Verilator × Cocotb 入门的最小可运行工程。
1. 跑通 01_base 基础流程
环境要求:
- Ubuntu(或 WSL2)
- Verilator(apt 或源码编译均可)
- Python(conda / 系统 Python 均可)
pip install cocotb
克隆仓库后进入:
1 | cd first_cocotb_testbench/01_base |
项目结构如下:
2. 示例流程讲解
在 01_base 目录下执行:
1 | make run-logged SIM=verilator |
该命令会:
- 调用 cocotb 的 Makefile 体系
- 使用 Verilator 对
src/dff.sv进行编译 - 运行 Python 侧的 testbench
- 将运行日志与波形存入
logs/目录(含report.log与波形文件)
Makefile 关键逻辑如下:
3. 原理讲解
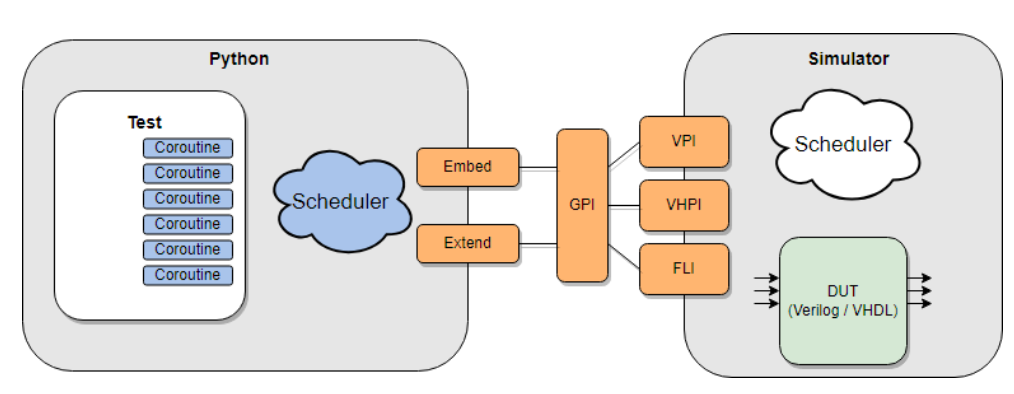
本示例由 Verilog 设计文件 dff.sv 和 Python Cocotb 测试文件 test_dff.py 组成,二者通过 cocotb 的 VPI/PLI 接口建立交互。
3.1 Verilog 代码讲解(被测模块 DUT)
1 |
|
解释:
- 上升沿采样:每个
posedge clk,q都会更新为d - 延迟语义:行为等价于 “q = d 上一拍的值”
3.2 Cocotb Python 测试代码讲解
1 | import random |
重点:
@cocotb.test():声明 Python 测试用例Clock(...):在 Python 侧创建时钟并驱动 DUTawait FallingEdge(...):事件驱动式仿真.value是 cocotb 写入和读取信号的标准方式- 断言错误会自动标红中止
3.3 Makefile 核心部分解释
1 | export PYTHONPATH := $(PWD)/testbench:$(PYTHONPATH) |
简要说明:
TOPLEVEL必须与 Verilog 中的模块名一致MODULE=test_dff指定 Python 测试入口VERILOG_SOURCES决定参与仿真的 RTL 文件cocotb-config自动选择正确的仿真器后端
换模块时,只需改:
src/*.sv、TOPLEVEL、MODULE,其余逻辑无需修改。
4. 小结
本篇示例展示了 Cocotb 最小可运行工程的结构和原理,包括:
- Verilator + Cocotb 的协同仿真流程
- Verilog DUT 的构成
- Python 异步 testbench 的写法
- Makefile 如何将两者串联
后续篇章将继续更新:
- 如何利用 Python 把仿真结果转换为可视化图表
- 如何让 Cocotb 通过 ModelSim 支持带 Vivado IP 的仿真
本博客所有文章除特别声明外,均采用 CC BY-NC-SA 4.0 许可协议。转载请注明来源 djdgctw 的硬件笔记!